Who You Callin' a Shrimp?

1 Comment

Who You Callin' a Shrimp?

Shrimp. So versatile.

You can barbecue it, boil it, broil it, bake it, saute it. Dey's uh, shrimp-kabobs, shrimp creole, shrimp gumbo. Pan fried, deep fried, stir-fried. There's pineapple shrimp, lemon shrimp, coconut shrimp, pepper shrimp, shrimp soup, shrimp stew, shrimp salad, shrimp and potatoes, shrimp burger, shrimp sandwich...

Perfectly articulated by Bubba in Forrest Gump, the laundry list of ways to cook and eat shrimp is seemingly endless, and for good reason.  It’s low in fat, high in protein, and a blank slate, ready to be painted with any number of flavors.  Definitely worthy of its own day.

Don’t you agree?  Seems many do, since National Shrimp Day is May 10th!

There are over 2,000 species of shrimp in the world, and each species’ flavor and texture is influenced by where it comes from, where it is raised, and what it eats. Wild shrimp live on river beds and ocean floors around the world, filtering particles in the water and feeding on seaweed and crustaceans, all of which gives them a more enriched flavor and thicker shells compared to their farm-raised friends.

Shrimp are loaded with healthy nutrients like lean protein, B vitamins, iron, and omega-3s, without the calories and fat present in other sources of these vital nutrients. As we’ve all been told over and over again, the omega-3s found in seafood such as shrimp have been shown to lower blood pressure and triglycerides, improve vascular function, and ease inflammation.  It also turns out that shrimp contain at least three unique antioxidants: astaxanthin, and the minerals selenium and copper.

While shrimp do have measured benefits, opponents to shrimp consumption argue that it’s not all that it’s cracked up to be.  Contaminated ocean waters, overfishing, poor farming practices, potential detrimental effects of certain fishing methods on wildlife, and shellfish contamination (especially mercury) are all reasons to pass on the seafood.  Additionally, the effect of farming practices on the environment have been argued in some cases to be harmful- foreign shrimp ponds discharge polluted water into nearby land and waterways, destroying land often used for agriculture as well as drinking water.

Despite its opponents, shrimp is the #1 most consumed seafood in the United States.  While the shrimp harvested in the U.S. come from the Atlantic, Pacific, and Gulf coast, most of the shrimp that we consume here, as high as 90%, is actually imported and farm-raised, with Pacific white being the most popular species. 

When choosing shrimp at the market, choose one that boasts an ocean-side fragrance, with a plump and juicy texture. When you get home, rinse them under cold water before tightly covering and refrigerating. Better yet, cook and consume as soon as you get back from your fish monger. 

Cooking shrimp takes little time and results in a dramatic color change from grey to pink, giving the cook a built-in tell of when to take them off the stove!  This color change has to do with the antioxidant astaxanthin contained in their shells and in the shells of other crustaceans such as crab and lobster.  When uncooked, the astaxanthin pigments are hidden by protein chains that give shells the blueish-grey color. When the protein strands are destroyed by heat, the astaxanthin molecules are released, and shrimp’s color explodes to orange.

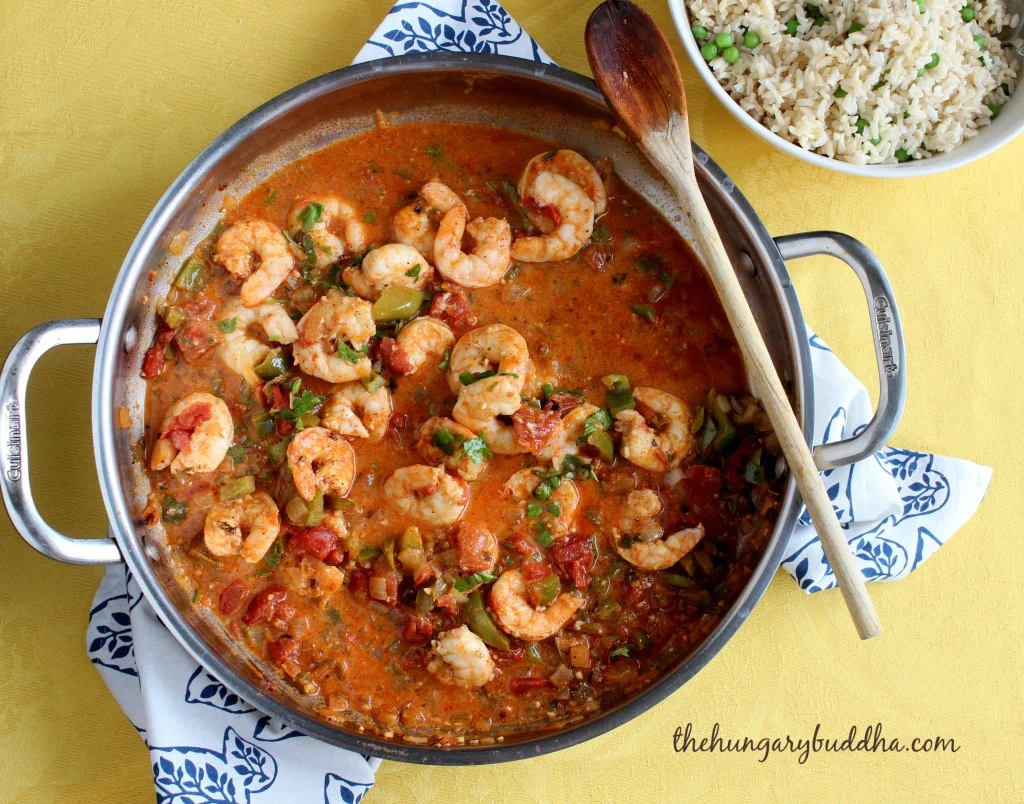
All of this talk of shrimp is making me hungry, and so I think it’s time for a recipe.  In honor of National Shrimp Day, this grandma recipe comes to me from Jackie Flowers.  When I asked her for a suggestion, she brought in her family’s cookbook that is heavily loved, held together by masking tape and dotted with hand-written annotations. The best kind of cookbook.  Jackie’s family comes from Belize, a nation whose cuisine is influenced by Mayans, Mexicans, Lebanese, Mennonites, Chinese, and most notably, the Creoles (who were, in turn, influenced by both African slaves and European colonists). It’s from this last group from which todays’ recipe, shrimp creole, draws inspiration today.

Shrimp Creole
Serves 4

foodseum shrimp creole

1- 1/2 pounds fresh shrimp, peeled and deveined
2 TB olive oil
½ large yellow onion, diced into small pieces
4 cloves garlic, minced
1 small green pepper, cored, seeded and diced into pieces the same size as the onion
1 cup diced tomatoes (you can use fresh, I used ½ a can)
¾ cup of white wine (I used Savignon Blanc)
2 TB fresh basil, cut into ribbons
2 TB fresh parsley, coarsely chopped
½ tsp salt
½ tsp black pepper
½ TB Worcestershire Sauce
1 TB hot sauce
1 tsp chili powder
1 tsp smoked paprika
1 tsp dried oregano
½ tsp cayenne pepper
1 bay leaf
2 TB heavy cream (optional, eyeball it)
White or brown rice, to accompany

Heat the oil in a heavy skillet. Add the onions, garlic and green pepper, bay leaf and spices. Cook over medium heat until soft, about 5 minutes.

Add the wine, and scrape the bottom of the pan to remove any bits. Add the tomatoes and bring to a boil. Reduce heat and simmer about 20 minutes until some of the liquid has been reduced.

Once the liquid has reduced, add the shrimp and cover and let cook about 5-7 minutes until the shrimp are all cooked (this shouldn't take long). Stir in the cream and add the basil and parsley at the end, right before you serve it.

Notes:  Bacon would be so good in this. So would some andouille sausage.


Chew on this: Some shrimp species are hermaphroditic.  Namely, peppermint shrimp first mature as males, and sometimes turn into a hermaphrodite with both male and female sexual organs.


Do you have any favorite shrimp recipes? Share them with us below or on any of our social media platforms. Don't forget to use the hashtag #FeedYourCuriosity and tag @Foodseum! 


Chrissy Barua lives in Lincoln Park and successfully lawyers by day despite an addiction to bad movies, cookies, and travel. She'll be bringing you monthly doses of delicious as she tries to track down the best grandma recipes she can find. (Follow her on her other cooking adventures at The Hungary Buddha Eats the World.)

1 Comment

The Test: Three-Hour Sourdough

Comment

The Test: Three-Hour Sourdough

Anyone even mildly familiar with bread and the science of bread baking would probably take one look at the title of this article and assume that I had lost more than a few of my marbles.

“Sourdough in three hours?! Nope. Can’t be done,” they would boldly exclaim. To a certain extent, they are right. A true sourdough cannot be rushed, accelerated, or otherwise prodded along; you could, of course, go out and purchase a sourdough starter, but where’s the challenge in that?

For the uninitiated, the big divider between an average loaf of bread you can slap together in around three hours and a sourdough lies in a simple mixture of flour and water. This “starter” is allowed to sit out for weeks, months, even years on end, and as it lies around, it creates a home for wild yeast. As time passes, these feisty yeast cultures produce carbon dioxide and alcohol, which impart distinct sour flavor into what was at first a flavorless blob of dough.

So how do we shortcut such an excruciatingly long process into a few hours? Quite simply, you don’t. Science does not enjoy being cheated, so we’ll still give our bread rise using the power of yeast, but look elsewhere for that distinct sour flavor. This month, we’re staring a seemingly impossible task in the face to create: the three-hour sourdough.

Getting Yourself Into a Pickle

A few weeks ago in my breads class at Le Cordon Bleu, our chef challenged us to create our own original breads (okay, it was actually an exam, but I totally took it as a challenge). Only a few parameters were put in place: it couldn't be too heavily enriched with things like eggs and butter, and had to maintain a fairly basic shape. Other than that, we had a good deal of freedom.

As always, finding inspiration was as easy as cracking open the fridge to see what was sitting around. It just so happened that I had prepped one of my favorite snacks the day before: pickled sweet onions in apple cider vinegar, brown sugar, and low-country blackening spice. My plan for them was fairly simple: in a bread that only contained flour, water, yeast, and salt, I would replace a portion of the water with my intensely flavored pickling liquid (as well as add the onions) to up the flavor of the dough.

So, dutifully following bread baking procedure, I whipped together my recipe with that slight amendment and handed the result to my chef. When he sliced into my loaf, he revealed a dense, under-cooked dough; horrified, I couldn’t help but wonder what could have gone wrong.

As it turns out, I hadn’t accounted for the harsh conditions that acid creates for yeast.  In addition to weakening the gluten structure, acid inhibits the yeast’s ability to produce essential gases and alcohol that give bread its rise and flavor. Because of this, a dough has a ceiling to the amount of acid it can handle, and will need almost double the amount of time to rise (which I hadn’t counted on).

Aside from the doughy, raw nature of my failed loaf, it did have a pleasant sour hint to it. So was there anything I could do to this recipe to develop that sour character while still making a well-made bread? It was time to hit the kitchen and find out.

Experimenting with (Acetic and Lactic) Acid

Whenever you hit a wall, especially in the realm of science, the best thing you can do is a little research. In this case, I had my pastry instructor from the University of South Carolina in mind. A man of many talents, Travis is particularly attuned to the workings of bread and food science in general. He had a couple of really great leads that would mark my starting points for the experiment:

Old Sourdough

Earlier in this article, I knocked a little bit on purchasing a pre-grown sourdough starter. There is absolutely nothing wrong with doing this, as it is a guaranteed route to great flavor; the only problem is that you are essentially growing a live yeast culture that demands constant, daily care. Perhaps not the best route fora casual home cook. Travis suggested something much more low-maintenance: simply take already a baked sourdough loaf (especially a staled one that would otherwise be tossed), and soak a portion of it in the water called for in the recipe.

Such an idea stems from the classic French “old dough” technique, in which an older portion of unbaked dough is added to a recipe. With the older dough that's already been fermented it automatically boosts the flavor of the new dough that it is added to. The yeast in a baked loaf of sourdough has dies in the high heat of an oven, but the goal is to carry the sour flavor from the baked loaf to the one being mixed, not the yeast.

What resulted was pleasing, if not ideal; tasters could not identify any carryover in sourness, but using the old, well-developed bread bolstered the flavor profile of an otherwise basic bread recipe. But was it so drastic a change that it will forever change the way you bake bread? Probably not. On to the next idea, then.

Lactic Acid

foodseum lactic acid

When we think about acids in cooking, we tend to work with two major categories: acetic and lactic. To over simplify it, acetic acids are the harsher type that we find in such products as vinegar, while lactic acids are the gentler ones that give a slight tang to some of our favorite dairy products.

One of the main contributors of flavor within a developed sourdough is lactic acid, so Travis suggested using whey protein runoff from a dairy product like yogurt. Using this alone, or even in conjunction with the harsher pickling liquid, would in theory contribute a tangy note to the bread, without being so acidulated that the bread couldn’t form. Taking time to hang the yogurt would push me outside of my three-hour window, but at this point I was hungry for results. One container of yogurt, some cheesecloth, and a little time later, I had accumulated more than enough whey to give this interesting idea a go.

Fortunately and unfortunately,  the bread did form nicely, but without any pronounced sour flavor. I had a nice loaf of sandwich bread, but sourdough this was not.

FullSizeRender.jpg

Ace(tic Acid) in the Hole

Several loaves of bread and zero satisfying results later, frustration was setting in. What had been the difference between my raw and sour dough and the well-baked but neutrally flavored breads I produced? Surely there was a middle ground somewhere that I could hit.

After some deep thought, it occurred to me that the problem with my original underdone batch of bread might have been the pickled onions. I had calculated the maximum amount of pickling liquid I could add to the recipe, but wasn’t taking into account the liquid that the onions held onto after coming out of the jar. This small amount of extra acidic liquid was a likely candidate in the downfall of my bread.

So I would bank everything on two last batches: both would have high (but not the maximum) levels of acid, and one would contain onions, but pickled in the exact amount of liquid the recipe called for. Finally! A positive result emerged, and I was so happy I could have (and maybe did) kiss the damn things.

Both fully-baked loaves did indeed produce a slight twang, but it was undeniable in a taste test that the loaf with the pickled onions exhibited concentrated blasts of tangy brightness. As an added bonus, the acid creates a looser “crumb” on the bread, helping the inside look less like a plain Jane sandwich bread and more like the artisanal sourdough it aspires to be.

I wouldn’t say that it matches the flavor profile of a sourdough whose starter has had years to develop, but it is on par with one given a few weeks to grow. Not bad!

I realize that a lot of people would rather run to their local bakery and grab a loaf, but bread baking is a relatively simple and rewarding process that I encourage anyone to try. As usual, I’ll leave you with the recipe, as well as a few general bread-making tips for the home cook who still feels a bit shy about the process.

foodseum three hour sourdough

Everyday Tips for Any Bread Baker

Invest in a Scale
Ingredients in a bread recipe are meticulously measured to produce exacting results. My recipe happens to translate fairly well to cups and measuring spoons, but this is rarely the case, and can really throw off your bread consistency.

Switch to Instant Yeast
Also known as bread machine yeast, instant yeast can be mixed directly into your dry ingredients without being dissolved in water first like active dry yeast. It will shave about five minutes off of your cook time, which is invaluable if you are doing large-batch baking.

Turn Your Dough
A large portion of your bake time in breads comes in two large chunks of time in which you have to allow the yeast to feed on the starches and sugars in a dough to produce gases. One of these byproducts is carbon dioxide, which does contribute to a dough’s rise as it expands, but actually prevents further yeast activity.

A common technique for regulating this CO2 development is to “punch” or press the gases from the dough. Rather than completely deflating the dough, fold it onto itself by gently lifting it from one end and pulling the dough up and over. Doing so will maximize rise and flavor, which is particularly useful when making a dough such as the Three-Hour Sourdough, which needs as much help as it can get.

No Proofing Box? No problem.
Professional bakers use large, temperature-controlled boxes to create a warm, moist environment that yeast loves, and causes breads to rise faster, thus shaving more time off the cooking process. Home chefs try to recreate this using a low oven and a pan of hot water, but here’s what I propose: fill a coffee mug halfway with water, microwave it to near boiling (about a minute should do), then place your covered bread in the now warm, moist “proofing box.” Boom.

Finishing the Bread
A few last tips for finishing your bread. Simple French breads such as the one in this article are in part characterized by a crisp, golden crust. Professional bakers achieve this by having hot steam-injected ovens. Recreate this effect by leaving an empty baking sheet on the bottom rack of the oven while it preheats. By the time your bread goes in, a little water poured onto the hot sheet pan will create billows of steam to crisp up your bread’s crust and give it deep, golden brown color.

LOW-COUNTRY ONION SOURDOUGH with BACON BUTTER

foodseum three hour sourdough success

Makes 1 12-inch round or 2 6-inch rounds

16 ounces bread flour (about 2 ¾ cups)
½ ounce instant yeast (about 1 ¾ tablespoons)
Pinch of kosher salt
1 recipe low-country pickled onions (recipe follows)
7 ¾ ounces warm water (about 1 cup)
Black sea salt (optional)
1 recipe bacon butter (recipe follows)

1. Preheat the oven to 500 degrees. Place an empty baking sheet onto the bottom rack of the oven.

2. Mix together the flour, salt, and yeast in a medium bowl. Add the pickled onions, pickling liquid, and water. Stir with a wooden spoon until combined.

3. Once the dough has absorbed the liquid, turn the dough out onto a floured work surface and knead until smooth, about 8-10 minutes.

4. Place the kneaded dough into a lightly oiled bowl, cover with a damp towel, and let rise in a warm, moist environment for an hour, folding the dough after 30 minutes.

5. Fold the dough once more, shape into a round, and place on a cutting board generously dusted with cornmeal. Cover with a damp towel and let rise for one hour.

6. Uncover the dough, brush with a small amount of water, and sprinkle with black sea salt and a bit of flour. Using the blade of a sharp paring knife, score an “x” in the top of the loaf.

7. Immediately place the scored loaf directly onto a preheated pizza stone or onto a parchment-lined baking sheet and place in the oven. Carefully pour a small amount of water onto the empty baking sheet, and immediately close the oven door.

8. Allow the loaf until deep golden brown, about 18-20 minutes. Remove from the oven and let cool on a rack for at least 20 minutes before slicing it open. Serve with bacon butter.

Low-Country Pickled Onions

1/2 Vidalia onion, julienned
1/3 cup apple cider vinegar
2 tablespoons brown sugar
1/2 tablespoon blackening spice (or your favorite spice blend)

1. Combine ingredients in a Ziploc bag, close tightly, and allow to sit in the refrigerator for at least one hour, or up to two weeks.

Bacon Butter

8 tablespoons unsalted butter, room temperature
4 slices applewood smoked bacon, cut in half

1. Place bacon strips in an even layer in an unheated sauté pan. Cook over medium low heat until bacon is crispy on one side, about 8-10 minutes. Flip and allow to crisp on the other side.

2. Drain cooked bacon on a paper towel-line plate. Once cooled, crumble into pieces and mix in a small bowl with the softened butter. Serve immediately or store in an airtight container in the fridge for later use.


Make this delicious treat and share your results with us. Comment below or send us a picture on our Instagram or Twitter. Don’t forget to use the hashtag #FeedYourCuriosity


Comment

Ole! Ole! It's the Fifth of May!

Comment

Ole! Ole! It's the Fifth of May!

Let me start this party off right by saying that I am a very proud Mexican-American woman – always have been, always will be. Listening to my grandfather speak Spanish and watching my grandmother make tortillas filled me with so much joy, and to this day the image helps me on rough days. That being said, Cinco de Mayo has always posed an issue for me. It is in, its simplest terms, just not that Mexican. While the holiday does celebrate a real event in Mexico’s history, Americans celebrate Cinco de Drinko much more than our buddies down south. While Mexican schools are closed on May 5 for observance of “The Anniversary of the Battle of Puebla,” it is not considered a national holiday anymore.

The holiday celebrates the Mexican army’s victory over the French in the Battle of Puebla, not our country’s independence as many think. French forces were occupying Mexico after the Mexican-American War, and Mexicans wanted them out. While heinously outnumbered and lacking the war technologies the French army had, the Mexican army was able to defeat their foes on May 5, 1862. Again, this is NOT Mexican Independence Day; that is celebrated on September 16.

So let's not pretend that this day is about anything other than having some chips, “guac”, and more than a couple of margaritas. My fellow Mexican-Americans, this year let's embrace the bastardized holiday; rather than reminding yet another gringo that this is not our Fourth of July, let's take a deep, calming breath and be happy that we get another day to celebrate the countries we love so much.

Now that all of that is out of the way, we can get to the really good stuff: the food. I put together a menu that blends our two cultures, while remembering that this holiday is largely an excuse to drink in the slow time between St. Patrick’s Day and Memorial Day.

Jalapeno Margaritas - If you want something a little sweet that packs as much punch as the Mexican army, look no further than this dangerously drinkable cocktail. Fun fact: These are the "spicy margaritas" made famous by Sur Lounge in LA. If you have ever seen Bravo's hit show Vanderpump Rules, you have definitely seen these signature drinks being served. 

foodseum spicy margarita

Recipe adapted from Love & Lemons 

3 cups good tequila…or bad tequila, we don’t judge
1 jalapeno, sliced
1 c Grand Marnier
1 ½ c fresh lime juice
1 c agave syrup
ice
Lime, salt, and jalapenos for garnish, if that’s your style

Mix the jalapeno and tequila. Let it sit for at least a few hours at room temperature, or up to a day if you have the time. Strain tequila through a fine sieve. Keep the jalapenos for yourself or your more daring friends. Mix all ingredients other than the tequila. Add the tequila to the batch half a cup a time. This stuff can get spicy, and you can always use some regular tequila if your guests are wimps. Once you get the taste exactly how you want, serve over ice or blend with ice.
 

BLT Tostada - Few things scream "Mexican-American hybrid" quite like the BLT tostada; a little Californian, a touch Mexican, but most importantly, just good eats. When making them for myself, I make a basic salad mix (lettuce, red onion, carrot, and whatever else I have in the fridge) and sub that for the plain lettuce. But you do you, friends.

foodseum blt tostada

Recipe adapted from My Brother’s Salsa website 

2 avocadoes, diced
½ # bacon, cooked and crumbled
½ cup tomato-based salsa or pico de gallo
1 cup sour cream
1 cup iceberg or Bibb lettuce, shredded
4 tostada shells
2 Roma tomatoes, seeded and diced
Cilantro and cheddar cheese to garnish

Mix half of the salsa with the cubed avocado and the other half with the sour cream. To assemble, spread sour cream mixture over the shell, top with lettuce, bacon, tomato, avocado, and garnishes. It’s really that simple.
 

Fruity Guacamole – Guacamole and avocados are probably the foods I eat the most of, so trust me when I say this is a nice take on the traditional guacamole. The sweetness in this balances and complements the spice from the margaritas very well. Chef Michael Simon as a version with blue cheese and bacon that you are certainly welcome to try, but I think my new favorite take on the classic is adding whatever fresh, tropical fruits I can find.

foodseum fruity guacamole

3 avocados, diced
½ red onion (white onion will work in a pinch), minced
1 small jalapeno (you can use some of the discarded one from the tequila), minced
Salt
1 Tbsp lime juice (to help stave off oxidation)
3 Tbsp cilantro, chopped
1 cup of diced pineapple or mango 

If you like chunky guacamole, simply mix everything and let it sit for about 15 minutes for the flavors to develop. If you like it a little smoother, put avocado, onion, jalapeno, and lime juice in first. Mush to your desired thickness, and add the rest of the ingredients.  
 

Churro Doughnuts - No matter your views on the holiday, you just can't do wrong with fried dough. This particular delight gets a huge flavor boost from brown butter and churro spices. Try them baked if you have a donut pan (which any household worth its salt should have). You could also just make baked or fried doughnut holes with the same recipe. Chris from Shared Appetite has a mouth-watering recipe and it is very well-written, so I am simply linking to their site.

foodseum churro doughnut

What are your favorite Cinco de Mayo classics? Comment below or shoot us a message on any of our social media accounts. Don’t forget to use the hashtag #FeedYourCuriosity, you just may see your delicious pics on our feed.

Comment

The Incredible, Edible (Hard-Boiled) Egg

Comment

The Incredible, Edible (Hard-Boiled) Egg

If you are anything like me, Easter means candy, candy, and coloring eggs – in that order. Something about dip-dying and decorating my favorite breakfast food really gets me excited. My problems come in the weeks following - my refrigerator is stocked with the most beautiful, putrid hard-boiled eggs; I make Cobb salad and egg salad, but there always seems to be another hidden egg right behind the milk.

Not this year. This year I decided to go international with my approach. What I found was that there was no reason to keep repeating the same tired egg salad every year. In fact, almost every culture worldwide has a utility recipe for leftover Easter eggs.

This may be because boiling eggs has been around for a long time – a really long time. From Ancient Egypt to Rome and Greece all the way up to the Renaissance, people were boiling eggs. Chicken eggs, in particular, were an important staple during medieval times because of their availability and versatility. Hard-boiled eggs would have popped up in salads, desserts, and breakfasts across Europe of old. In Japan, people would submerge eggs in pools of hot sulfuric water until they turned black in an effort to live longer.

Nowadays, we don’t have to carefully stoke a fire to boil our eggs. Instead you can use my patented method (trademark pending). Put your raw eggs in a pot of water with one teaspoon of white vinegar for every quart of water. Make sure the eggs are submerged and not crowding each other.  Put the pot of water on a burner and turn it to medium-high. Cover and wait. When the water is rapidly boiling - not just a couple of bubbles, but really going crazy - turn the stove off. Cover and wait again. When the water is cool enough to touch, you should have yourself a pot full of perfectly cooked eggs.

But what do you do with them…?


Pickled Eggs –  recipe adapted from the National Center for Home Food Preservation 

These bar snacks have been around for centuries. The briny, sour treat is the perfect accompaniment for a pint or seven. Obviously, there are many varieties and ways to pickle eggs, but this cider-y recipe is tasty and consistent for anyone new to pickling.

hbe 2.jpg

Cidered Eggs
12 hard-boiled eggs, peeled
1 ½ c apple cider vinegar or apple juice
½ c white vinegar
6 thin slices of onion
1 ½ tsp salt
1 tsp pickling spice
1 peeled garlic clove

Mix all ingredients other than the eggs and bring to a boil. Let the mixture cool. Put your eggs in Mason jars and pour the liquid in. Make sure the eggs are fully submerged. Refrigerate. For small eggs, you need to pickle for at least two weeks. If using larger eggs, three to four weeks. The eggs will keep in the fridge for up to four months. 


Scotch Eggs – recipe adapted from Jamie Oliver 

To continue the trend of egg dishes that are great with a drink, I bring you the Scotch egg. The British delicacy was said to have been invented in 1738 at a London department store, but there is evidence as far back as the Moghuls of people wrapping meat around a hard-boiled egg and calling it lunch. Wherever its origin, this indulgent little nugget is eaten cold at picnics and warm at pubs.

8 hard-boiled eggs, peeled
2 eggs, beaten
1 # sausage meat
1 bunch fresh chives, finely chopped
1 bunch parsley, chopped
pinch of nutmeg
1 Tbsp English mustard
salt and pepper
Flour, for dusting
1-2 cups good breadcrumbs (I like a 50-50 mix of Panko and plain)
Oil, for frying

Heat oil to 300 degrees in a deep pot or frying pan. Mix sausage meat, herbs, nutmeg, mustard, salt and pepper thoroughly in a bowl. Divide into eight balls. Set up a breading station with flour on the first plate, the beaten egg on the second, and the breadcrumbs on the third. Flatten the sausage out in your hand and place the egg in the center (your goal is for the egg to be fully encased in sausage). Dredge the ball in flour, then eggs, then the breadcrumbs - really make sure it gets covered in breadcrumbs. When the oil is hot, place eggs into oil and cook for about 4-5 minutes or until the entire ball looks deep golden brown. Remove and let rest. Serve with cheddar, pickles, and ale.


Egg Curry – recipe adapted from About.com 

Truth be told, this article came to fruition on Easter at an Indian buffet. My partner and I eschewed the traditional meal and decided we would try Viceroy of India on Devon. In one of the steaming vats of deliciousness were hard boiled eggs, vegetables, and sauce. I thought it might be a nod to the holiday, but after tasting it, I realized it’s placement on the buffet was definitely not to be cheeky and cute. It was so good – vegetarian and filling and all good things. We got about three steps out of the restaurant before I started looking up egg curry online.

hbe 4.jpg

6 hard-boiled eggs
5 Tbsp neutral oil (vegetable, canola, sunflower)
2 medium onions, quartered
3 medium tomatoes, quartered
2 green chiles (jalapeno will work)
2 tsp garlic paste
2 tsp ginger paste
2 tsp coriander, ground
1 tsp cumin powder
1 tsp garam masala
½ tsp turmeric powder
½ tsp red chili powder
salt
2 potatoes, cubed

Fry onions in 2 Tbsp of oil in a deep pan. When golden, pull from the heat and put into a food processer. Grind onions, tomatoes, and green chiles into a smooth paste. Add the remaining oil to the same pan and fry the paste you just made for about two minutes. Add ginger, garlic, and dry spices to the paste and continue frying until the oil separates from the masala (vegetable and spice mixture). Add two cups of warm water and bring to a boil. When boiling, add potatoes. Cook over medium heat for about 20 minutes, or until the gravy has reduced to almost ¾ its original volume. Cut the eggs in half vertically and add them to the sauce. Drop heat to low and simmer for ten minutes. Serve with rice and chopped coriander leaves.


Southern Deviled Eggs – recipe adapted from Southern Foodways Alliance 

Deviled eggs are one of the oldest food in the South. They are so named because the slight spice and paprika on top was quite risqué for the early-1800s South. No matter their nefarious origins, deviled eggs quickly became a picnic staple for most Americans. This is a pretty standard recipe, but feel free to twist it in your own way. Several Chicago menus feature fancier versions of this incredible, edible egg, like the truffle and black trumpet mushroom version at Sable Kitchen and Bar.

1 dozen hard-boiled eggs
¼ c REAL mayonnaise...this is critical
¼ c Dijon mustard
4 Tbsp butter, softened
1 tsp lemon juice
¼ tsp cayenne
salt and white pepper
paprika for garnish

Peel eggs and cut in half lengthwise. Remove the yolks, and rub them through a mesh strainer into a bowl. Add mayo, mustard, butter, lemon juice, and spices (other than paprika) and mix well. Put filling into a pastry bag and pipe back into eggs. Dust with paprika. Chill until ready to serve; the flavors will develop as the mixture sits, so let them chill for at least an hour.


Pulpeta – recipe is from My big, fat, Cuban family 

Pulpeta is one of the most wonderful, indulgent, satisfying things you can put in your mouth. Seriously, it’s that good. Think a fried-ish meatloaf stuffed with vegetables and hard-boiled eggs and usually topped with a slightly spicy sauce. That being said, it is also a little complicated to make. I can admit my own limitations, and I quickly realized I could not improve on this recipe by Marta from “My big, fat, Cuban Family.” So rather than simplify it, I am linking to it. Read the recipe, try the recipe, and peruse the site. Marta has a ton of lovely Cuban recipes.

hbe 6.JPG

Do you have any favorite recipes that use up hard-boiled eggs? If so, please send them our way! Comment below or join the conversation on our Facebook and Twitter.

Comment