Burgers are beloved but much abused. Blogger Milo Klos lays out how to 1. create a perfectly juicy burger and 2. pick the right accoutrements.
I’ll never forget my first day of culinary school years ago. In the dining area of the university's kitchen, we students gathered around our chef instructor delivering a lecture on flavor. He asked us to visualize biting into a McDonalds Big Mac and to describe the flavors we associated with it. As we mulled over the question in our minds, we found it surprisingly difficult to answer. There aren’t really flavors per se. A Big Mac just tastes like, well…a Big Mac.
Next, he had us close our eyes as he described what he considered to be an actual hamburger: a masterfully seared, juicy beef patty, a plump, ripe slice of tomato, crisp lettuce, beautifully melted cheese, all on a warm, buttery, toasted bun. Had any of us opened our eyes, we almost certainly would have caught half of the class shamelessly drooling over this nonexistent burger being described to us.
His point was that a great burger, and truly good cooking in general, relies on layers of flavor that crash into our taste buds in waves, adding up to an unforgettable dish. Compare that to that Big Mac, which stumbles flatly onto the palate, creating nothing more than a one-note gut bomb.
We always want the burger from under the golden arches to taste as good as it looks on the ads, but we’re increasingly let down with each successive purchase. So this month on The Test, I’ve set out to craft a burger. Even the most meticulously crafted Instagram picture will not be able to properly capture it's taste (but I'll sure as hell try). We’re here to make: the perfect burger.
BREAKING BAD (BURGER HABITS)
Not to harp too strongly on various burger chains, but for all their supposed improvements and revamping of their sandwiches, one thing really never gets better: the burger patty itself. The patty is the crux of the dish, and should be so good it’s able to be hugged between two buns and left alone.
So how do we get to the photo perfect patty that doesn’t taste like the dried meat hockey puck your uncle just whipped off the grill?
Perhaps the answer lies in the quality of the meat, but that’s not necessarily the key. Just because you paid an extra two dollars on the pound for ground bison means nothing for your dish if you take it back home and ruin it, right? Right.
So take a look at what we’ll use in molding burger greatness: a humble pound of lean ground chuck.

It literally breaks my heart to see people aggressively mashing their meat into patties like cavemen. Listen, meat gains an adhesive property when it’s ground, so basically all you have to do after you take it from the package is portion and shape it; no manhandling necessary.

Another all too common pitfall is that we tend to be weirdly shy about seasoning our meat, which is essential for a number of reasons, the first being that meat doesn’t inherently carry a ton of flavor. As a general rule in cooking, your proteins and starches are going to need a bit of a helping (and somewhat heavy) hand when seasoning. Kosher salt and fresh ground black pepper are the essentials in my book, but any other seasonings you use to supplement punchier flavor are certainly smart plays.

Aside from aiding in unlocking added flavor, that kosher salt is actually playing a much more important role. As chefs move through a dish, they tend to toss small pinches of salt into the pan as new ingredients are added; this salt actually leeches moisture from the food, allowing for better browning of the natural sugars and proteins.
By this principle, salt is key in searing the surface of our burger patty, giving us a flavorful crust that both locks in moisture and prevents our burger from turning into dog food by the time it’s cooked to temperature.
If you think you’re ready to hit the kitchen, pump the brakes for me; we still need to address the worst habit of all, which seems to be somehow worked into the male DNA.
So, guys. You’re in the backyard at your barbecue, and you’re pit master; as usual. Your buddies are huddled around you, beers are cracked, and everybody is waiting with bated breath for the first burger to come off the grill.
As your friends watch on, do you press down on each patty to help develop that seared crust? Do you flip them every minute or so to make sure they’re evenly cooked?
If so, for the love of God please stop. A pressed burger is going to lose any juice it’s trying to hold on to and will be dry in no time flat. One that is flipped constantly struggles to have heat reach the center, so by the time it’s cooked through? Dry as a bone, baby.
Your take-away from my scenario should be this: burgers, and almost all protein you’re cooking want a rocking hot pan (or grill) to seal in juices, and it does not want to be touched in any way until it’s cooked about three quarters of the way through. By these rules, when you do flip that sucker it should look like mine, with a wonderful seared crust.

ROUNDING OUT THE RECIPE
Seem like a lot of rules for something as simple as a burger? Well, the good news is that every choice you make about your burger from here is the right one, because how you build the rest of it is only limited by your creativity. To help nudge you in the right direction however, I have a few tips to get you started on the final elements.
The Bun
I think very few people would argue with me saying that a fresh, baked-that-day bun is the ideal vessel for your now perfect patty. I also think is that what’s more likely to be lying around the kitchen is bread that’s perhaps…not so fresh.

So why put such a beautiful piece of meat on second string bread when you can breathe new life into it? Plus, if you cook from scratch like I do, it will give your poor microwave a sense of purpose. Wrapped in a paper towel pouch, your dried bread has wafts of steam pumped into it, and after about fifteen seconds is pillowy soft!
The Cheese
Again, this is an area that falls squarely into the realm of personal preference, but there are certainly many different roles that cheese can take on when it comes to dressing up your burger.
Melting Cheeses (Havarti, Fontina, Cheddar) – These cheeses add a pleasantly creamy note to a burger, and when perfectly melted really enhance visual appeal as well. Put a slice or two on your bread and let them take a minute or two under a high broiler, but keep an eye on them. Cheese separates if exposed to heat for too long, causing fat to pool on the surface, killing both the texture and the appealing look.
Crumbling Cheeses (Feta, Bleu, Cotija) – Crumbling cheeses make a fantastic finishing touch to any burger, often adding a complexity of flavor, while giving good height and color to the dish.
Spreading Cheeses (Goat, Brie, Ricotta) – Instead of spreading a glob of mayonnaise on that burger, rather enhance it with a shmear of cheese for an extra touch of complexity and creaminess. For bonus points, fold in extra goodies like bacon, minced shallots, or herbs into the cheese before spreading.
The Rest
Okay, again, when it comes to crafting the perfect burger, aside from the prepping and cooking technique used to prepare the patty, pretty much every single element of the sandwich can be customized in any infinite number of ways.
Now that you know how to prepare it, do you go for a more costly protein like that ground bison we talked about earlier? How about a leaner option using ground turkey or chicken? Maybe we go completely vegetarian and use black beans to form our patty.
So with so much freedom to decide these elements, it should be no surprise to hear that moving outside of the lettuce/tomato/cheese/mayo combination is highly encouraged. In shaping my creation, I wanted to take advantage of one of my favorite things to prepare in the kitchen: roasted veggies.
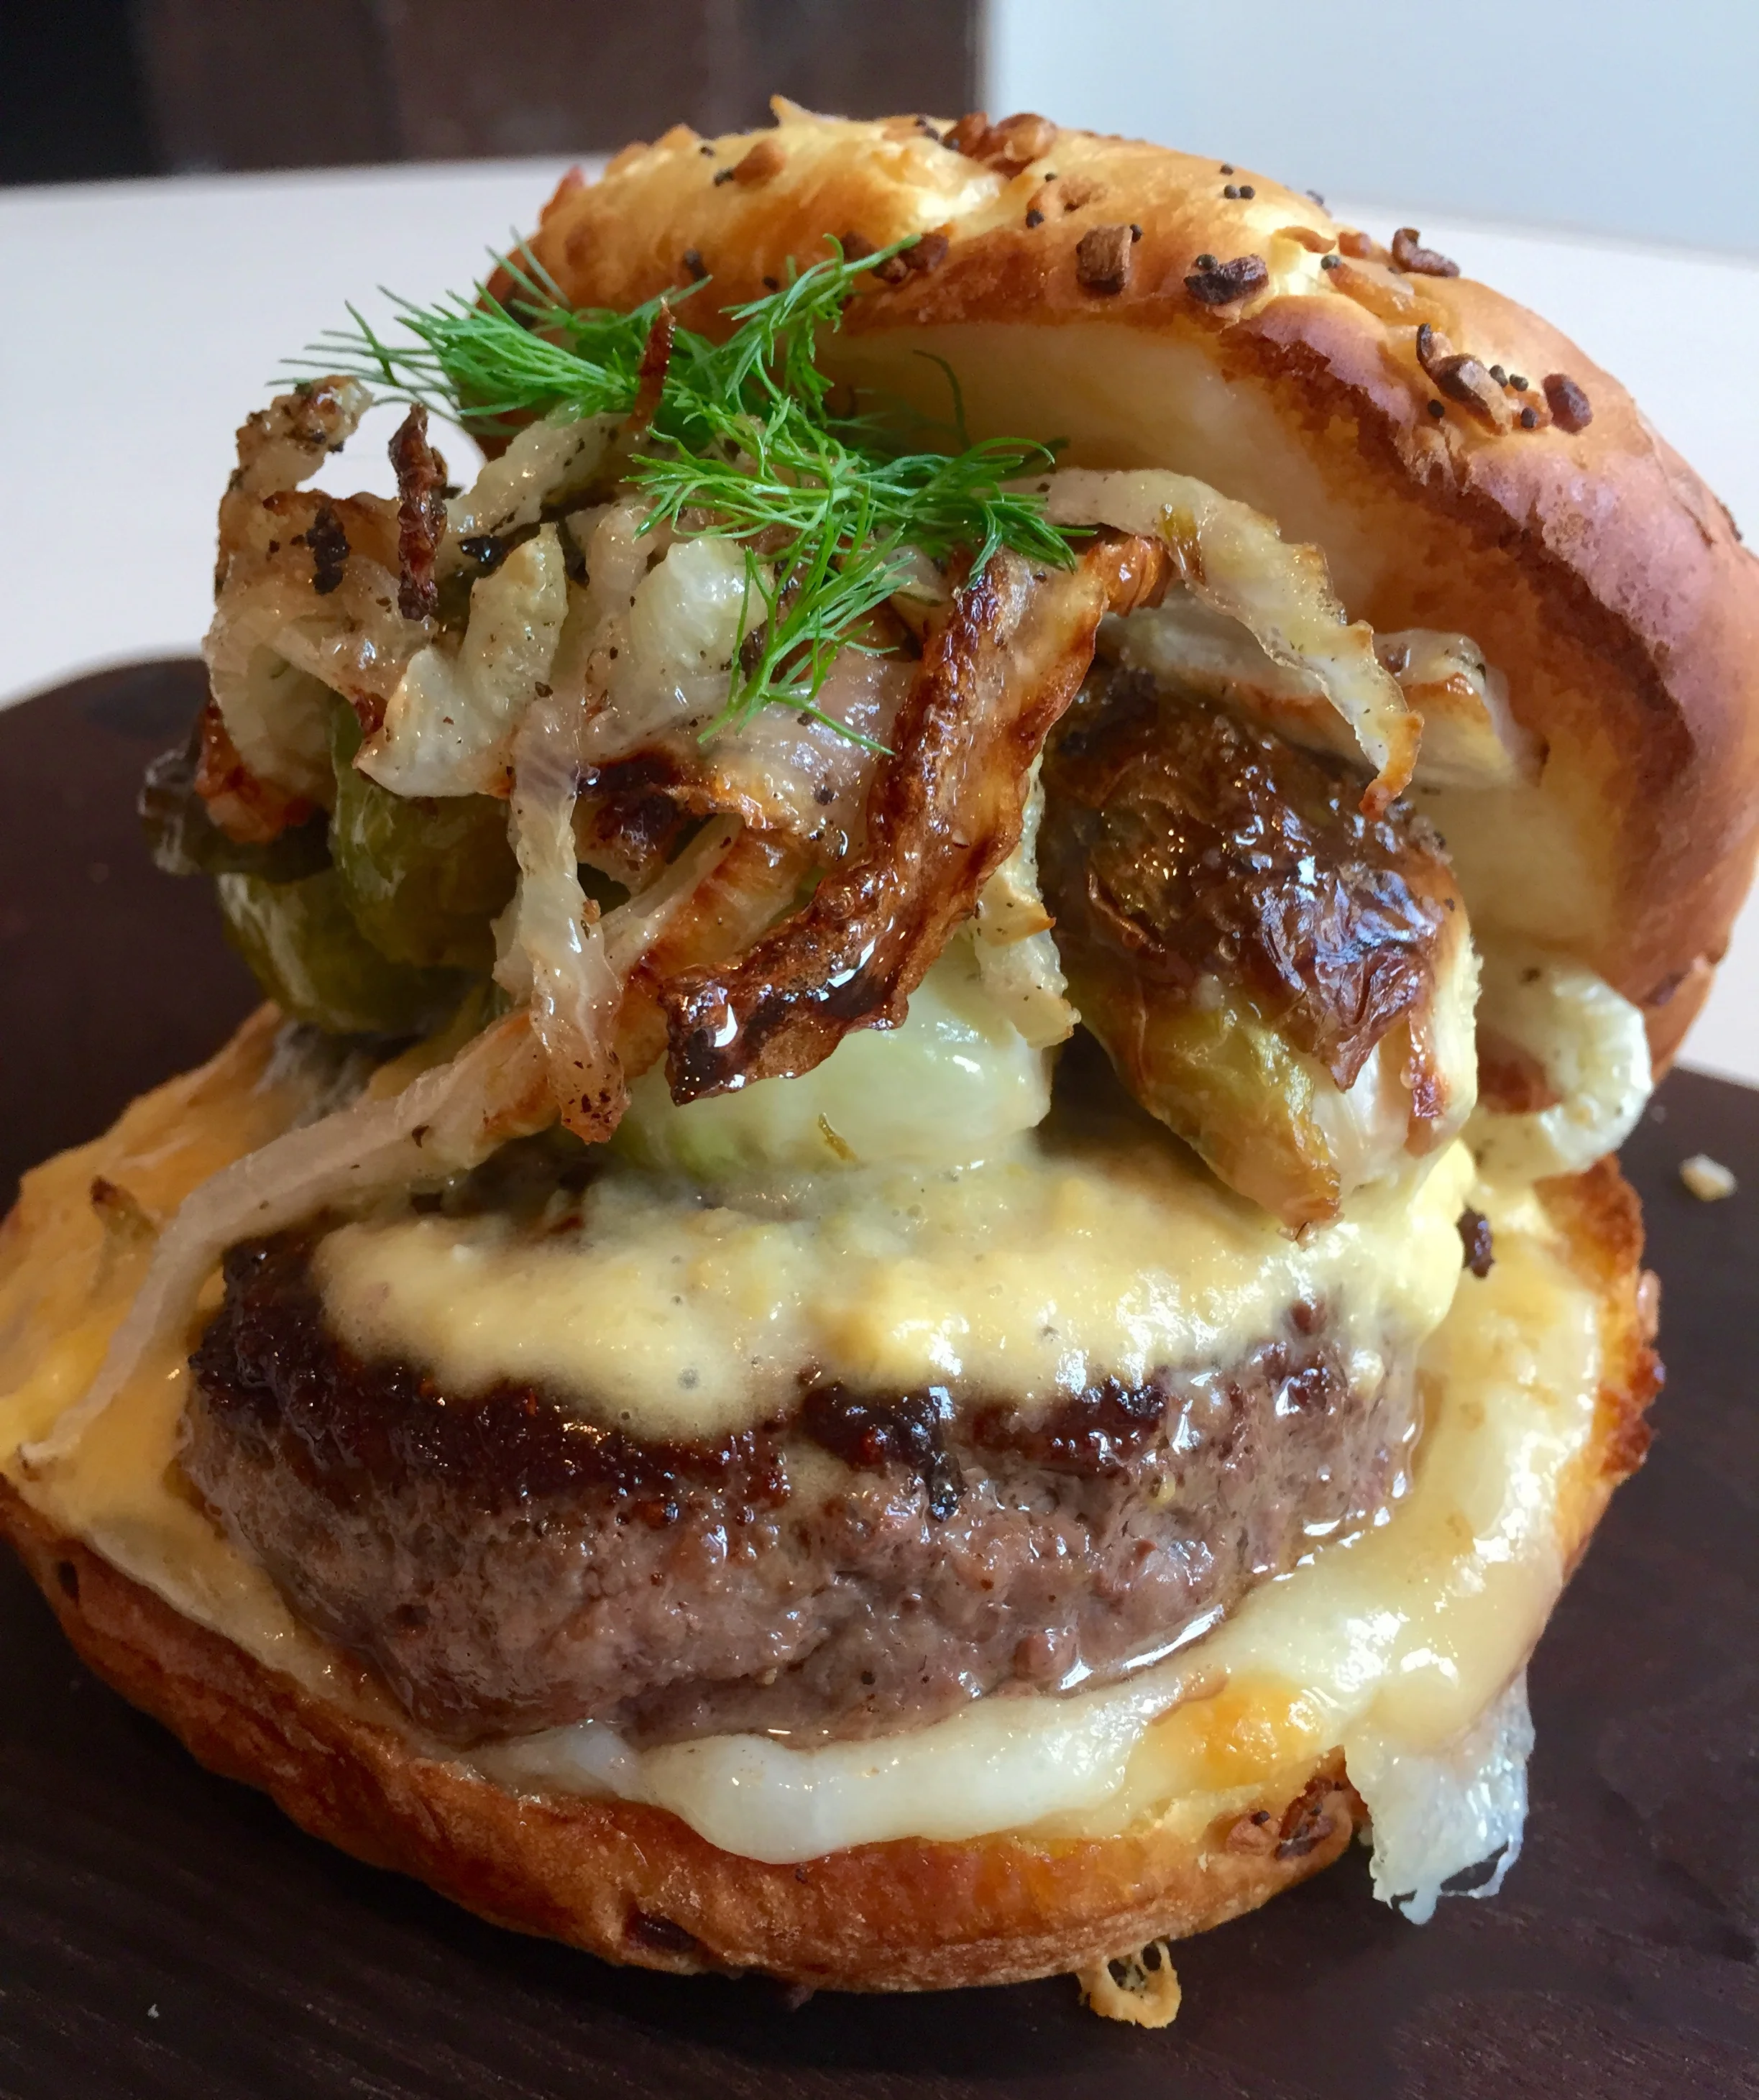
Brussels sprouts, fennel, and butternut squash may not strike you as the most likely candidates for burger toppings, and that’s the point. Dreaming up new accoutrements to your dish is simply about pulling on previous experiences, and remembering what excited your palate in the past. Having prepared this roasted veggie trio earlier in the year, I remember thinking how perfectly it would pair with just about anything, so my chances of having it work atop a meat patty were pretty darn high.
So set out on your burger journey, do as I do, and use my techniques to dress the perfect, picturesque burger!
THE PERFECT (ROASTED VEGGIE) BURGER

Serves 3
1 pound Brussels sprouts, ends trimmed and outer leaves removed
1 head fennel, core and stems removed, sliced thin, fronds reserved for garnish
½ butternut squash, peeled, seeds removed, large dice
Canola oil, as needed
1 pound lean ground chuck, portioned into 1/3 pound patties
3 cloves garlic, skins removed and smashed
¾ cup water
2 tablespoons heavy cream (optional)
3 onion rolls, cut in half
6 slices white cheddar cheese
Kosher salt, freshly ground black pepper, as needed
Preheat the oven to 425 degrees.
Place Brussels sprouts, butternut squash, and fennel in a medium bowl. Add a generous pinch of kosher salt and freshly ground black pepper, then toss with just enough oil so that the ingredients are lightly coated.
Transfer veggies to a foil-lined baking sheet and roast in the oven until they are well browned and tender, about 25 minutes.
Lightly tent the fennel and Brussels sprouts with aluminum foil to keep warm, and transfer the roasted squash to the carafe of a blender or food processor.
Add the cloves of garlic and pulse until well blended, then add the water and cream (if used) to smooth the mixture. Season to taste with kosher salt and black pepper, then transfer to a small pot over low heat to keep warm.
Heat a heavy-bottomed pan over medium-high heat; when hot, add enough oil to lightly coat the bottom of the pan. When the oil begins to shimmer, add the burger patties and allow to cook undisturbed until they are cooked ¾ of the way through.
Flip the patties, and continue to cook until a digital instant read thermometer register an internal temperature of 140 degrees. Remove from the pan and tent lightly with aluminum foil to keep warm.
Switch the oven to a high broiler. Wrap the onion rolls in paper towels and microwave for about 15 seconds, or until soft.
Split the rolls and put a slice of cheese on each, then let cook under the broiler until the cheese is just melted.
To assemble, place a patty on the bottom half of each bun and top with the warm butternut squash purée. Place a few roasted Brussels sprouts and pieces of roasted fennel on top, and garnish with reserved fennel fronds. Serve immediately.

Brand new to Chicago, Milo Klos received both his BA in creative writing and his culinary certification from the University of South Carolina. He taught cooking classes for a couple of years in a classroom kitchen in SC, but recently decided to move to Chicagoland to study baking and pastry at Le Cordon Bleu. Currently working as a private chef here in the city, Milo enjoys unwinding from a long day with a slice of pizza and anything even remotely Batman related.